{{mpg_city}} Van & RV Secrets | Save $100K by using 9 simple …
The Power You’re Supplying: It’s Electrifying
/
The Power You’re Supplying: It’s Electrifying
DISCLAIMER: We are not qualified or electricians. Do not rely on our advice regarding electrical systems and installations. Do your own education, research, or hiring of qualified electricians to electrify your van. The following is intended to describe what we did; not what you should do, although it may help you understand some of the jargon and commonly used components.
This aspect of your van build may have you turning in circles. Like most DIY van builders, you probably know little about how electricity works and nothing about how much you will use; there’s a ton of jargon; and there are a hundred different paths to the same goal: enough electricity to last to your next recharge.
We’ll give you details for one path. We won’t go as far as saying it’s the simplest path, but it is a medium difficulty path that anyone can follow with a little mental elbow grease. The planning takes some time, but the actual install probably can be done in a day or two.
Here are the basics: we use our existing vehicle battery to charge a separate house battery while driving. This house battery powers all of our 12V DC devices directly (refrigerator, vent fan, lights, USB chargers, etc.) and powers an inverter for 120V AC devices (laptops or anything with a regular plug like in your house).
AnswerVanswer is reader-supported. When you buy using Amazon links on our site, we earn a small commission. But don’t worry, the price you see does not increase at all and our reviews will always remain 100% honest. Learn more.
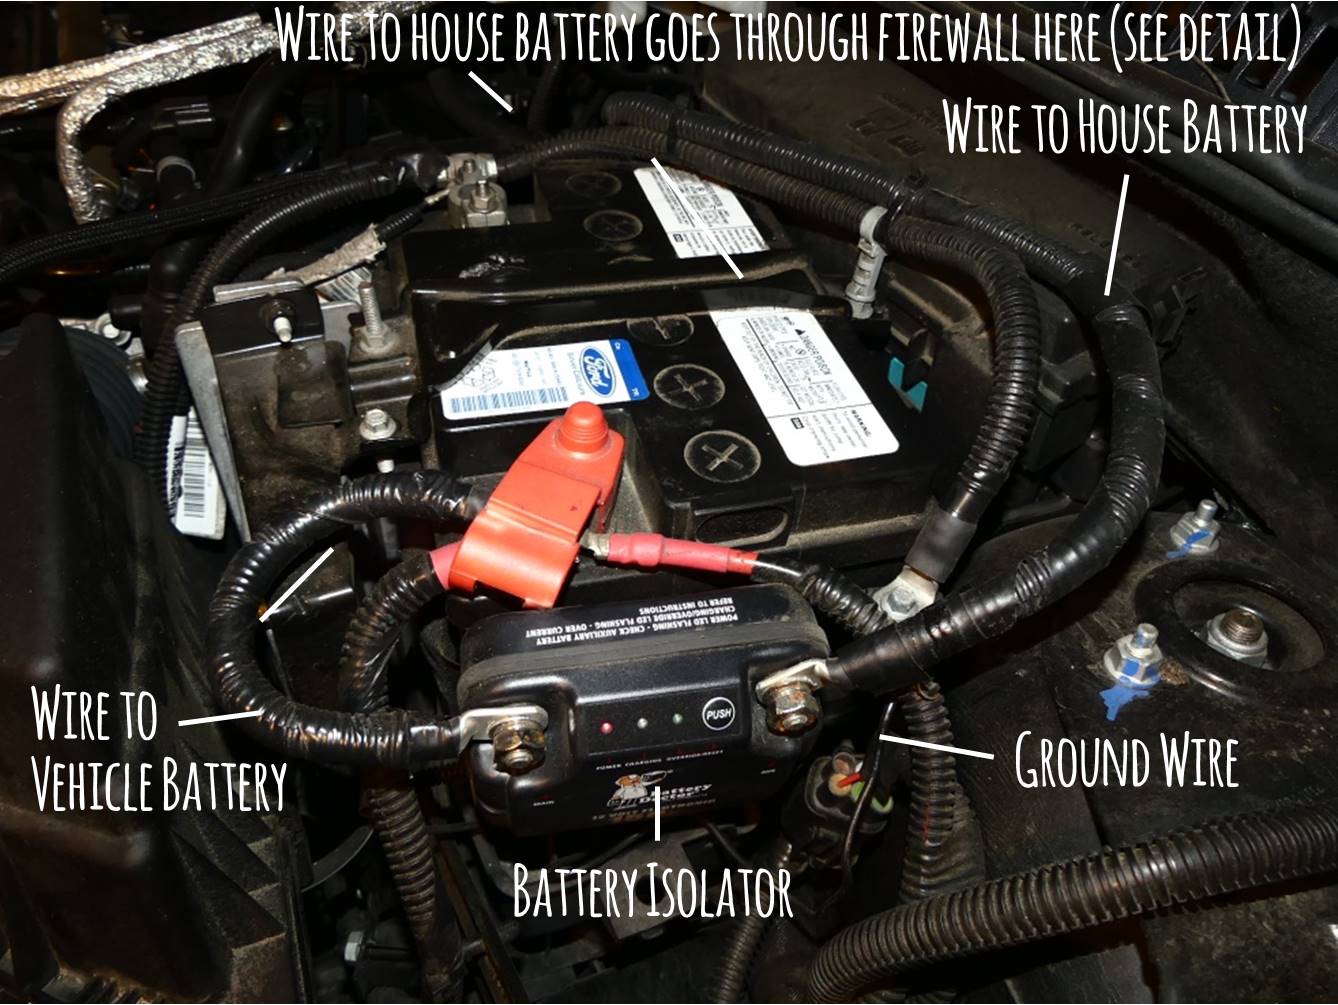
Battery Isolator: Isolates the house battery from the vehicle battery when the ignition is off (so leaving your lights on won’t leave you with a dead vehicle battery).
Disconnect: Completely disconnects power from the vehicle battery to the house battery. Unplugging this (and our light and fan wires from the ceiling) lets us completely remove the modules from our van in case we have to move a couch or something big.
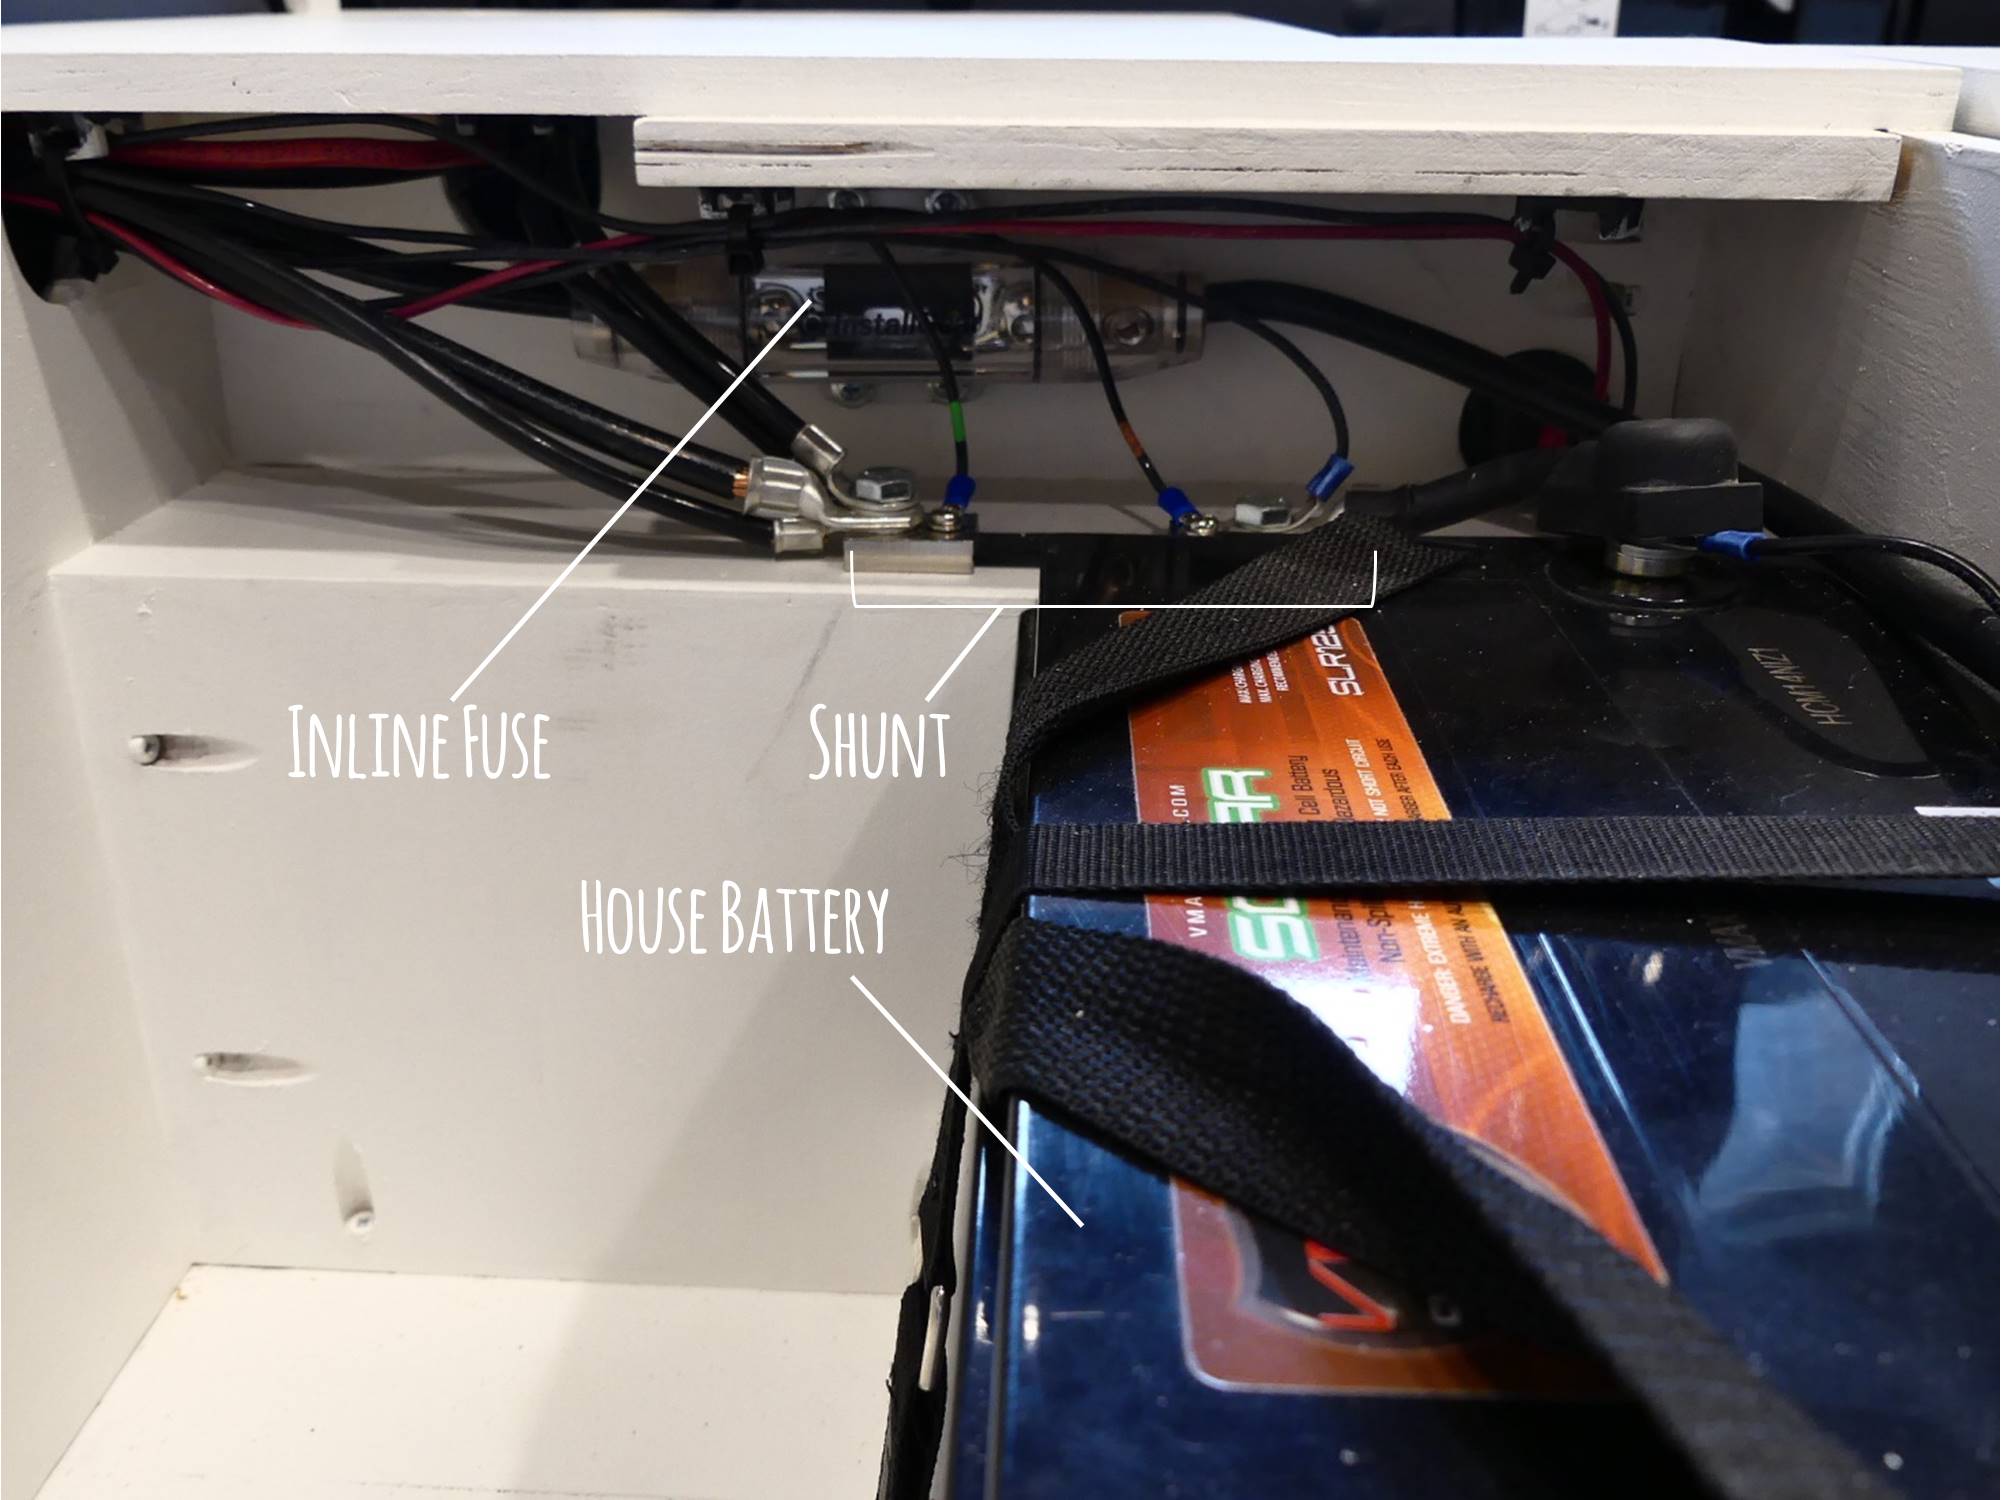
Inline Fuse: Protects the battery isolator from >150 amp power surge from house battery (a $12 part to protect a $90 part is good insurance).
Circuit Breaker: Disconnects power from the house battery to everything downstream (low voltage disconnect, inverter, fuseblock-powered devices, etc.) in case of a 100 amp power surge. It can also be manually turned OFF to temporarily disconnect power for safety or long term storage.
Low Voltage Disconnect: Protects house battery, one of the most expensive parts of your electrical system, from being discharged too low by automatically disconnecting power when the battery voltage level hits a lower limit (12.4V/50%, for example). Reconnects power when the battery level reaches a restart limit (13V/100%, for example). 50% is the minimum recommended charge level for lead acid batteries.
Fuseblock and Fuses: If a battery surge occurs, the 50 cent fuse will blow to protect the expensive 12V fan, light, refrigerator, battery monitor, USB socket, etc.
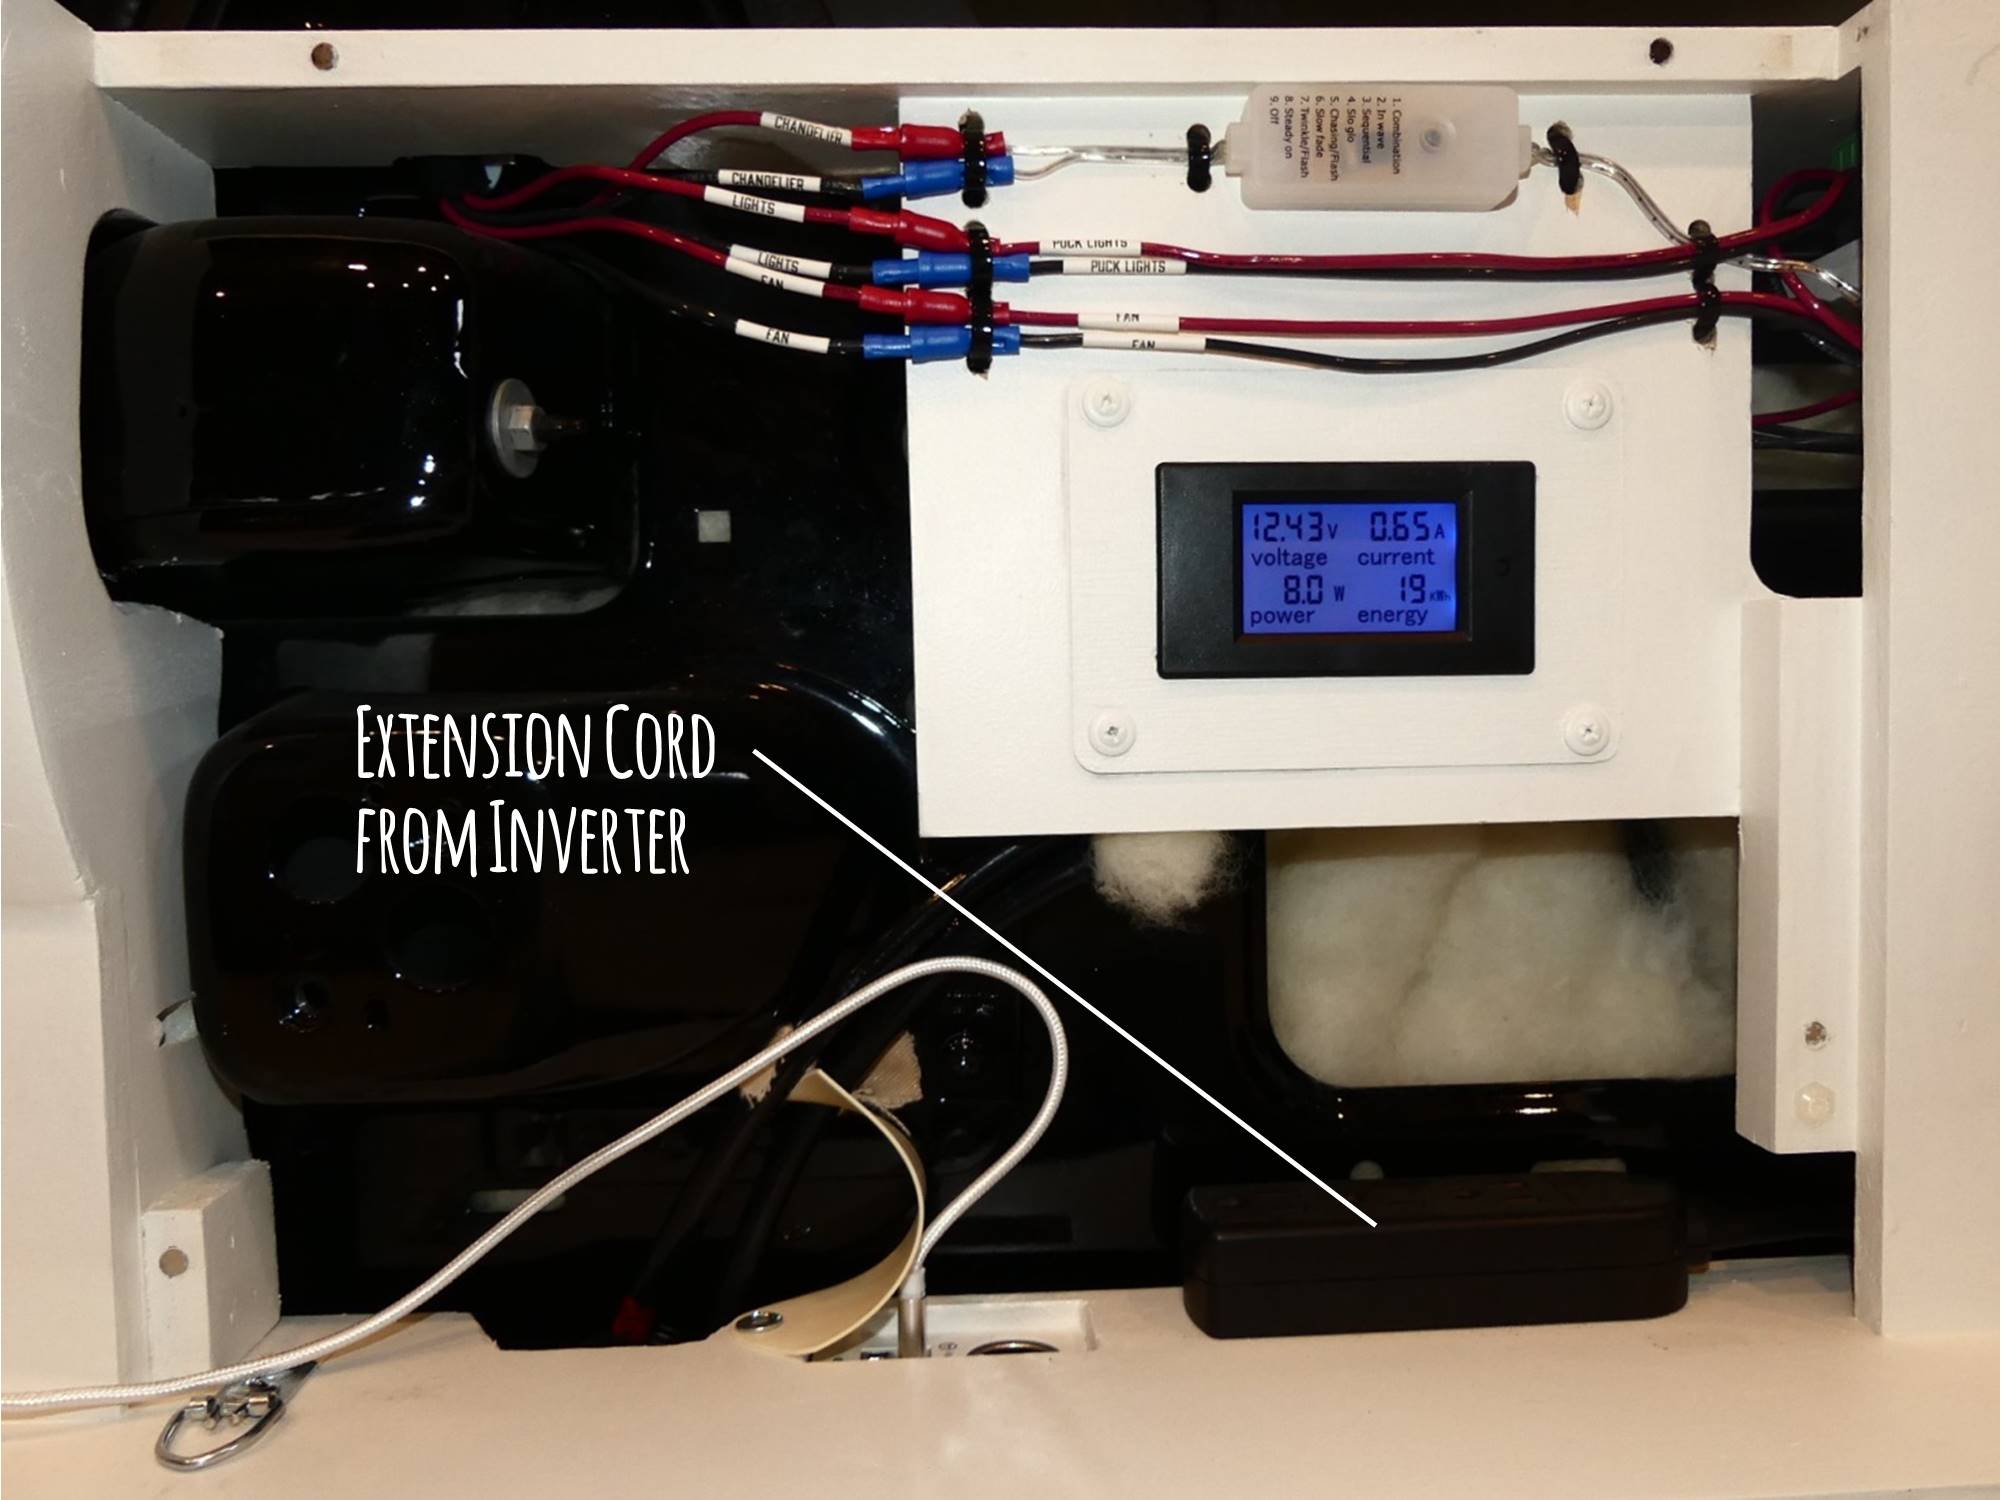
Battery Monitor with Shunt: Displays battery voltage, current, active power, and energy usage from all devices. This gives us a way to check on our battery status to see when it is getting low (i.e. before the low voltage disconnect turns everything off).
Dimmer Light Switch: Controls the brightness of 4 of our 8 ceiling puck lights (the other 4 are strictly on/off based on the opening of the van doors).
12V Socket: This lets us plug in 12V devices, like the refrigerator.
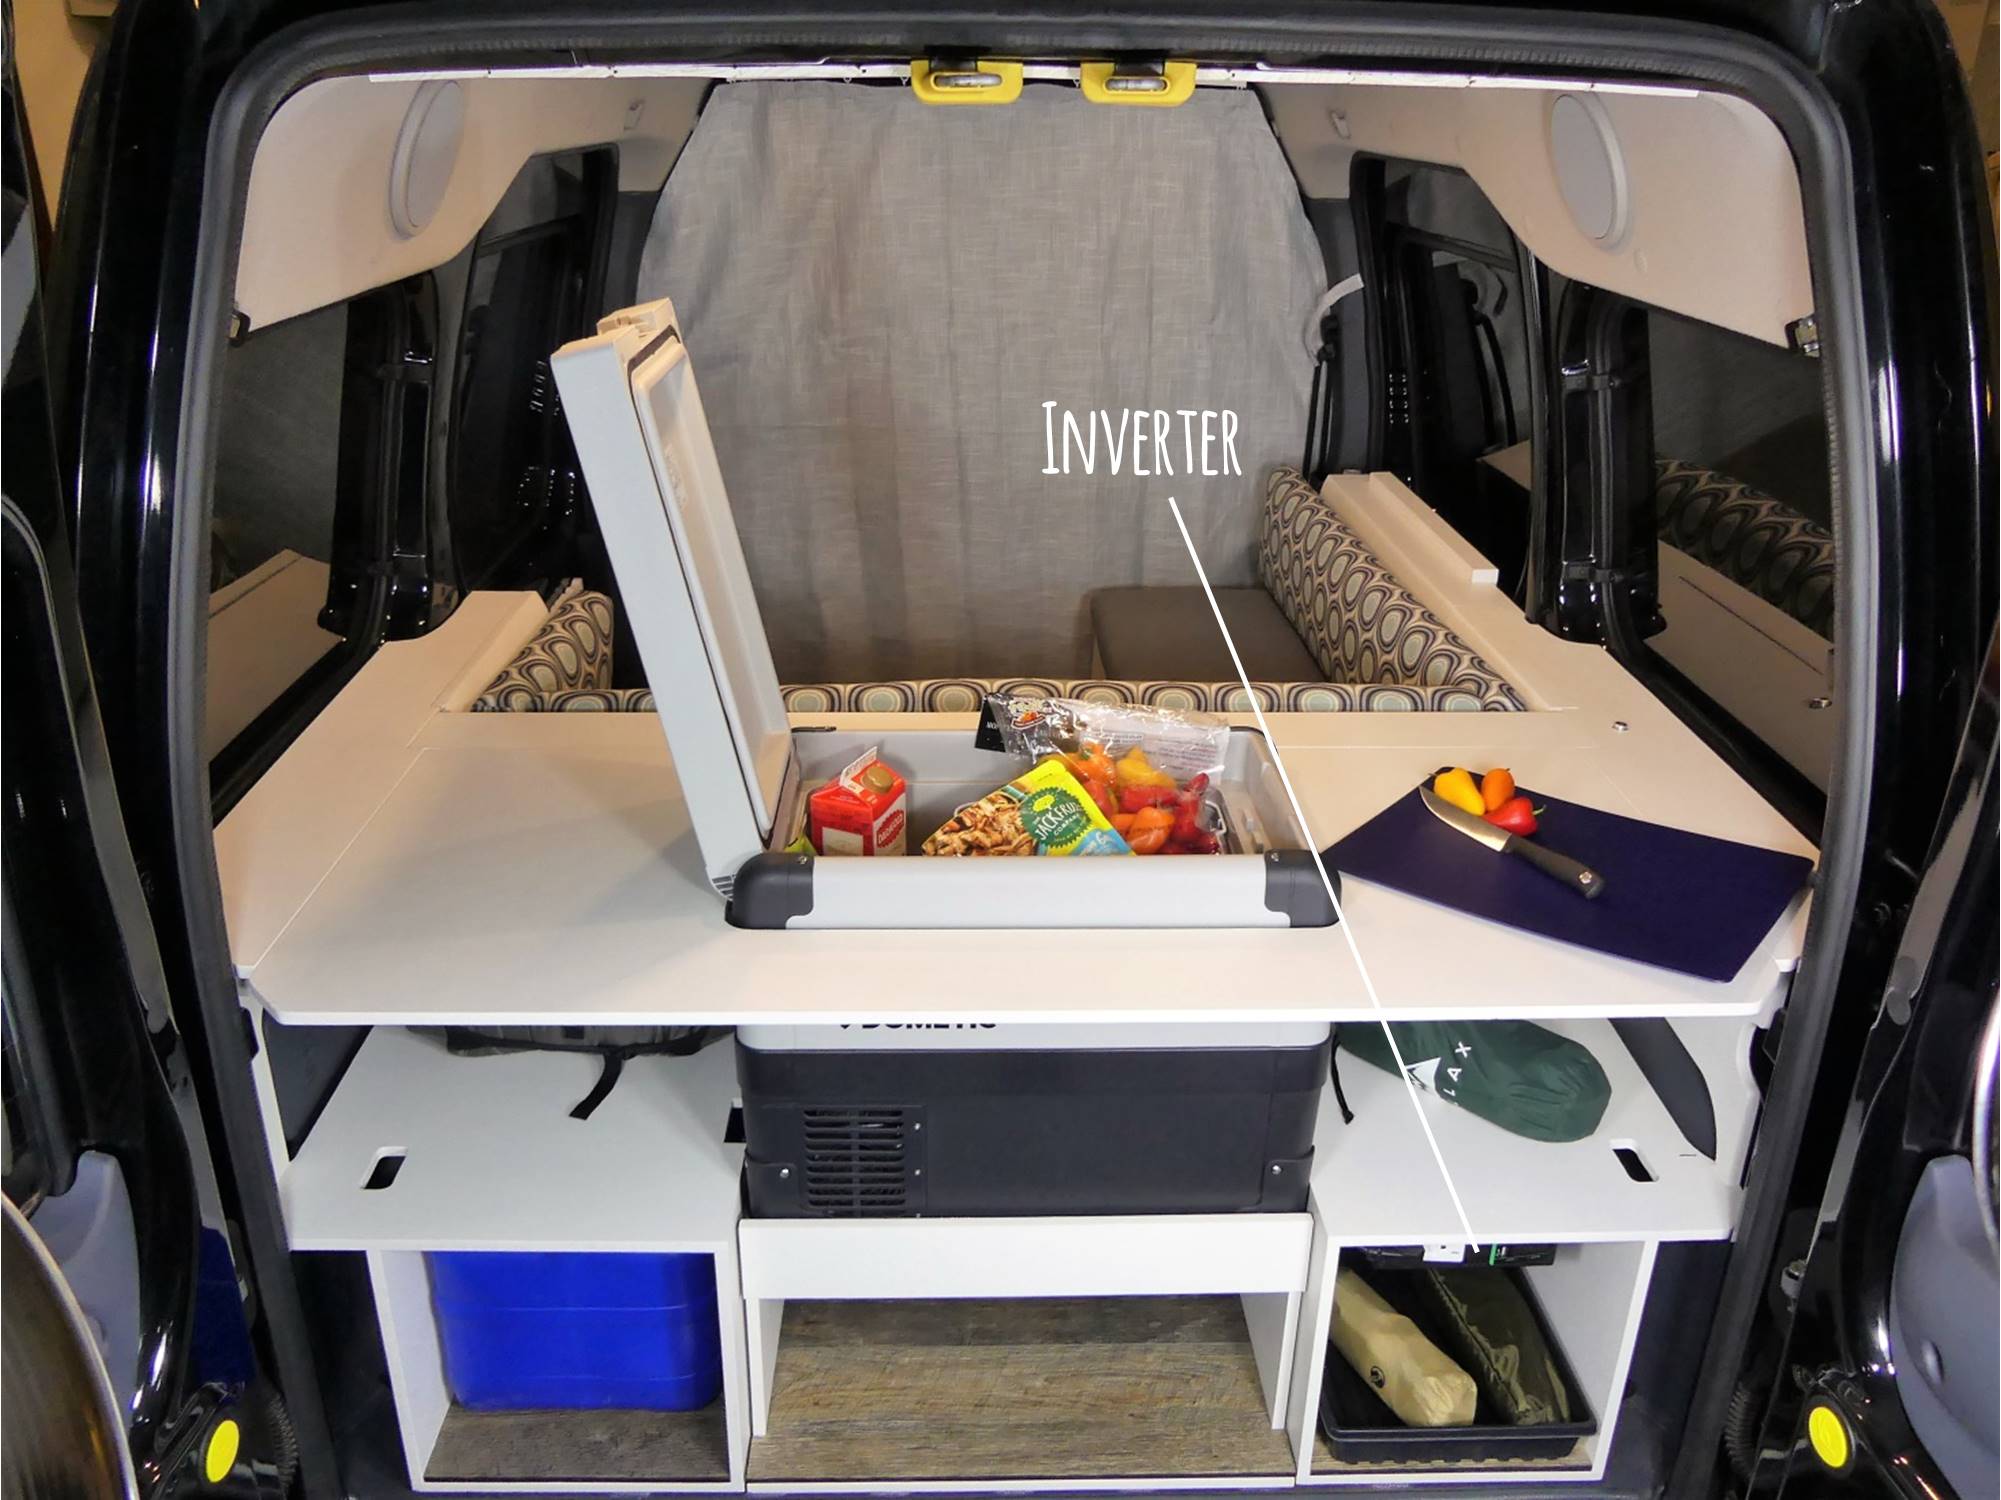
Inverter: Provides AC power for our laptops or anything with a regular plug like in your house. Our Pure Sine Wave (PSW) inverter turns battery DC power to AC power that is nice and clean. High tech AC devices like laptops can be damaged by charging them via DC (and they charge slowly). This is optional; some people do charge from USB or 12V.
Extension cord, 3 plug: This plugs into the inverter and lets us plug in up to 3 AC devices with regular electrical plugs.
Wire, 2 Gauge: We used 2 gauge wire (~25 feet for our mini RV van) from the batteries to the battery isolator, disconnect, inline fuse, and shunt.
Wire, 6 Gauge: We used 6 gauge wire (~6 feet black and 5 feet red) from the battery to the circuit breaker, low voltage disconnect, inverter, fuse block, and inverter and from the inverter to the shunt.
Wire, 14 Gauge: We used 14 gauge wire (~20 feet black and 20 feet red) from the fuse block to all of the 12V equipment we use in the van (fan, lights, dimmer, USB outlets, fridge, and battery monitor).
Terminals:You’ll need an assortment of terminals for the ends of all your wires. We used a range from
2AWG ring terminals 1 gauge cable lugs ring terminals, 5/16” M8, 10 pack, qty 1 $10.99 (AC/DC Wire and Supply) to
Crimping Tool: We needed the mechanical help to make the crimps on the very thick 2AWG wires.
Approximate Total:
$950 ($800 without the 120V inverter parts)
Summary
Start by using an online power consumption calculator to figure out what size battery you need. Estimate your power needs per day (for example, working from the van with two laptops (120V) for 1-2 hours per day, charging a phone via USB, using a 12V vent fan and some LED lights for reading or playing cards). Multiply that by the number of days you expect to be camping in one place without driving (if you’re charging from our vehicle battery while driving). This will determine your required electrical system capacity. Calculate how much wire you need and buy all your electrical parts.
After you order all your parts, do a dry fit to figure out where everything will be mounted. You want to keep your wires as short and the routing as simple as possible.
Mount a disconnect inside the van (if you want your power setup to be removable) and mount but don’t connect a battery isolator under the hood. Mount the inline fuse, shunt, and battery monitor and connect the wires. Mount the circuit breaker, low voltage disconnect, and fuseblock and connect the wires. If you want 120V power (we only use it to power our laptops, which some people do using 12V or USB chargers), mount an inverter. Mount the dimmer light switch and USB/12V socket and connect the wires. Install wires from the fuseblock to the dangling ends of the light and fan wires you left hanging after you installed your ceiling. Install a house battery. Now connect the disconnect you installed in step 3 and turn the circuit breaker ON that you installed in step 7 to supply power to your wonderful creation!
Step-by-Step Procedure
Estimate Your Power Needs and Make a Diagram
List Electrical Devices
Make a list of all of the electrical devices you will be using in daily van life.
Also estimate the number of hours you will use each electrical device per day.
Now write down what type of voltage they use (AC=120V, DC=12V), and what their listed watts are.
You can usually find the voltage and watts on a label on the device, on literature that came with the device, or google.
For example, one of our 12V LED lights uses 3 watts x 4 lights = 12 watts.
Calculate What Battery Size You Need
Using a list of all of the electrical devices you will be using in daily van life, write down what type of voltage they use (AC=120V, DC=12V), and what their listed watts are:
You can usually find the voltage and watts on a label on the device, on literature that came with the device, or google.
For example, one of our 12V LED lights uses 3 watts x 4 lights = 12 watts.
Now do some math to figure out what battery size to buy. We used a great (solar) energy calculator from www.parkedinparadise.com. Plug the numbers you came up with in the previous steps into the battery part of the calculator (battery calcs require watts and voltage) to see what battery size you need.
For example, this calculator told us we needed one 59aH (aH=amp hours, a measure of battery charge) lead acid battery per day which factors in never discharging the battery below 50% (saving the life of your expensive battery). We doubled that (assuming we would stay in one place for 48 hours – arriving in the afternoon day 1 and leaving in the afternoon of day 3) and bought one 125aH battery. Just in case we grow more sedentary, we designed our van to house a second battery down the road, but have not run out of power yet.
Make a Diagram
This next step will save your sanity. Draw a diagram of all your electrical components. It doesn’t have to be fancy; we did ours on the computer so you can read it, but a hand sketch on a piece of paper works just as well. (You’ll probably revise this at least 10 times throughout the process.)
You’ll end up with a finished diagram like this one: the bubble numbers correspond to the steps in this blog.
Figure Out Wire Lengths and Gauges and Finalize Wiring Diagram
Now estimate all of the wire lengths using a tape measure in your van and add those to your diagram.
For each device, calculate the amps by dividing the watts by the volts you wrote down during the earlier battery calculation. Write the amps on your diagram.
For example, all 4 of our 12V LED lights use 12 watts / 12V = 1 amp.
Using your wire lengths and what amps they will be carrying to the devices and use a calculator (like https://www.wirebarn.com/Wire-Calculator-_ep_41.html) to figure out what gauge wires are required (different amps over different lengths require different diameter wires to carry the electrical load safely). See the separate blog Everything You Need to Know About Wires for Your Van for how we chose these sizes. For every device we wrote down the recommended wire gauge range on our diagram. Then we grouped the results into 3 wire sizes (2, 6, 14) for our build to help keep it simple.
Dry Fit Your Components in Place to Figure Out the Best Way to Route Your Wiring
Hold all of your electrical parts in place (most of ours are in 2 places: battery compartment under the seat or electronics bay behind the seat back) to imagine your optimal wire routing. You want to keep your wire lengths as short as possible (because you lose voltage over length). Try not to cross wire because it makes tracing future problems easier.
Install Main Disconnect and Ground (2 Gauge)
Start with an easy one to learn how to cut and strip wires and how to crimp terminals onto the ends. We bolted the main disconnect to the sheet metal just rear of the passenger sliding door. See the separate blog Everything You Need to Know About Wires for Your Van for more answers about how to cut wires and install terminals.
Install Battery Isolator (2 Gauge)
Install the battery isolator under the hood by the vehicle battery and run the 2 gauge wire through the firewall into the van. This will vary widely by vehicle, but we had to remove an existing rubber plug covering a hole in firewall. We cut the center out of the rubber plug large enough to fit our 2 gauge wire and replaced the rubber plug in the hole. Then we manhandled the thick wire through the front of the cab and around the outside of the passenger seat. We popped off the plastic passenger side floor trim all along the pathway en route to the disconnect to hide and protect the wire (then reinstalled it after the wire was in place). And voila! No visible wires.
Install Inline Fuse and Shunt (2 Gauge) in the Battery Compartment
Mount the inline fuse housing and wire it to the disconnect. Add a wire that you will connect to the house battery that you’ll add in step 10.
Mount the shunt and wire it to the disconnect. Add a wire that you will connect to the house battery that you’ll add in step 10.
Install Battery Monitor (14 Gauge) in the Electronics Bay
Mount the battery monitor and install 3 wires between the battery monitor and the shunt per the battery monitor’s instructions. Install the 4th wire from the battery monitor to the positive terminal on the fuseblock that you’ll add in step 7.
Install Circuit Breaker, Low Voltage Disconnect, Fuse Block, and Wires to Shunt (6 Gauge) in the Battery Compartment
WARNING: Turn the circuit breaker OFF until AFTER step 11 when you program the low voltage disconnect.
Mount the circuit breaker, low voltage disconnect, and fuse block. It helps if you can mount them in this order from the house battery. Wire the circuit breaker to the low voltage disconnect (IN/BATTERY) and add a wire that you will connect to the house battery that you’ll add in step 10.
Wire the low voltage disconnect (OUT/LOAD) to the fuseblock.
Wire the fuseblock negative terminal to the shunt (load side).
Install Inverter (6 Gauge) and Extension Cord
Install all of the wires to the back of the inverter, mount the inverter, then connect the other ends:
Install one (red) wire between the inverter (+) terminal and the low voltage disconnect OUT terminal.
Install one (black) wire between the inverter (-) terminal and the shunt (load side).
Install one (black) wire between the inverter ground terminal and the shunt (load side).
We mounted a short 3 plug extension cord in our electronics bay and plugged it into the inverter which faces the rear of the van. That way we can access AC power both inside the van and out of the back of the van.
Install Dimmer Light Switch, USB/12V Sockets and Wires to Fan, Ceiling Puck Lights, and Chandelier (14 Gauge)
Mount the 12V socket for the refrigerator, the USB/12V combo socket, and dimmer switch for the lights and wire them all to the fuseblock.
We added bullet terminals to the LED light wires and (optional) chandelier fairy light wires hanging down from our ceiling so we could unhook them if we need to remove our entire setup from our van. Then we added a wire (with a bullet terminal on one end) between the ceiling light bullet terminals and the dimmer OUT terminals. We cut the existing chandelier fairy light wire in order to install bullet terminals between the fairy lights and the little control box that came with them (which we mounted in the electronics bay). Then we connected the existing wire from the control box to the fuseblock. You might wire your lights directly to a dimmer or on/off switch if you have a permanent setup.
We added bullet terminals to the vent fan wires hanging down from our ceiling (see blog How to Install a Van Vent Fan) so we could unhook them if we need to remove our entire setup from our van. Then we added a wire (with a bullet terminal on one end) between these vent fan bullet terminals and the fuseblock. You might wire your vent fan directly to the fuseblock.
Add a wire between the low voltage disconnect terminal 3 and the house battery that you’ll add in step 10 (negative terminal)
Install House Battery (2 Gauge)
WARNING: Unplug the disconnect and turn the circuit breaker OFF!
Secure the battery in place. We screwed in Velcro straps to keep the battery from moving. Connect the loose wires from your other devices that have been waiting for the battery: inline fuse, circuit breaker, low voltage disconnect, and shunt.
Reconnect the disconnect but leave the circuit breaker OFF.
Programming Devices and Tidying Up
Program any devices that require it. For example:
Program the battery monitor voltage alarm setting per the manufacturer’s instructions; do this after battery power is connected.
Program the low voltage disconnect voltage and mode per the manufacturer’s literature (i.e. connect the ground wire to the PROG pin and removing it when the desired setting is reached on the display).
Install wire cable tie mounts and zip ties as needed to tidy up the wires to keep them from rubbing or moving around.
Turn the circuit breaker ON.
Test all the devices to make sure everything is working and give yourself a huge pat on the back because YOU DID IT!
Real World Experience
We were a little surprised and more than pleased with ourselves when we were done and everything worked like it was supposed to. We have camped in one place for 3 days and never came close to running out. Here are a couple of real world examples of our usage (remember we can go as low as 12.4V; this keeps our house battery above 50% discharge which prolongs the life of our battery):
Day 1 started at 13.02V, refrigerator maintained 41 degrees in 75+ degree weather, charged phone, used laptop 1.5hr=12.86V
Day 2 started at 12.82V, refrigerator maintained 41 degrees in 75+ degree weather, charged phone=12.78V