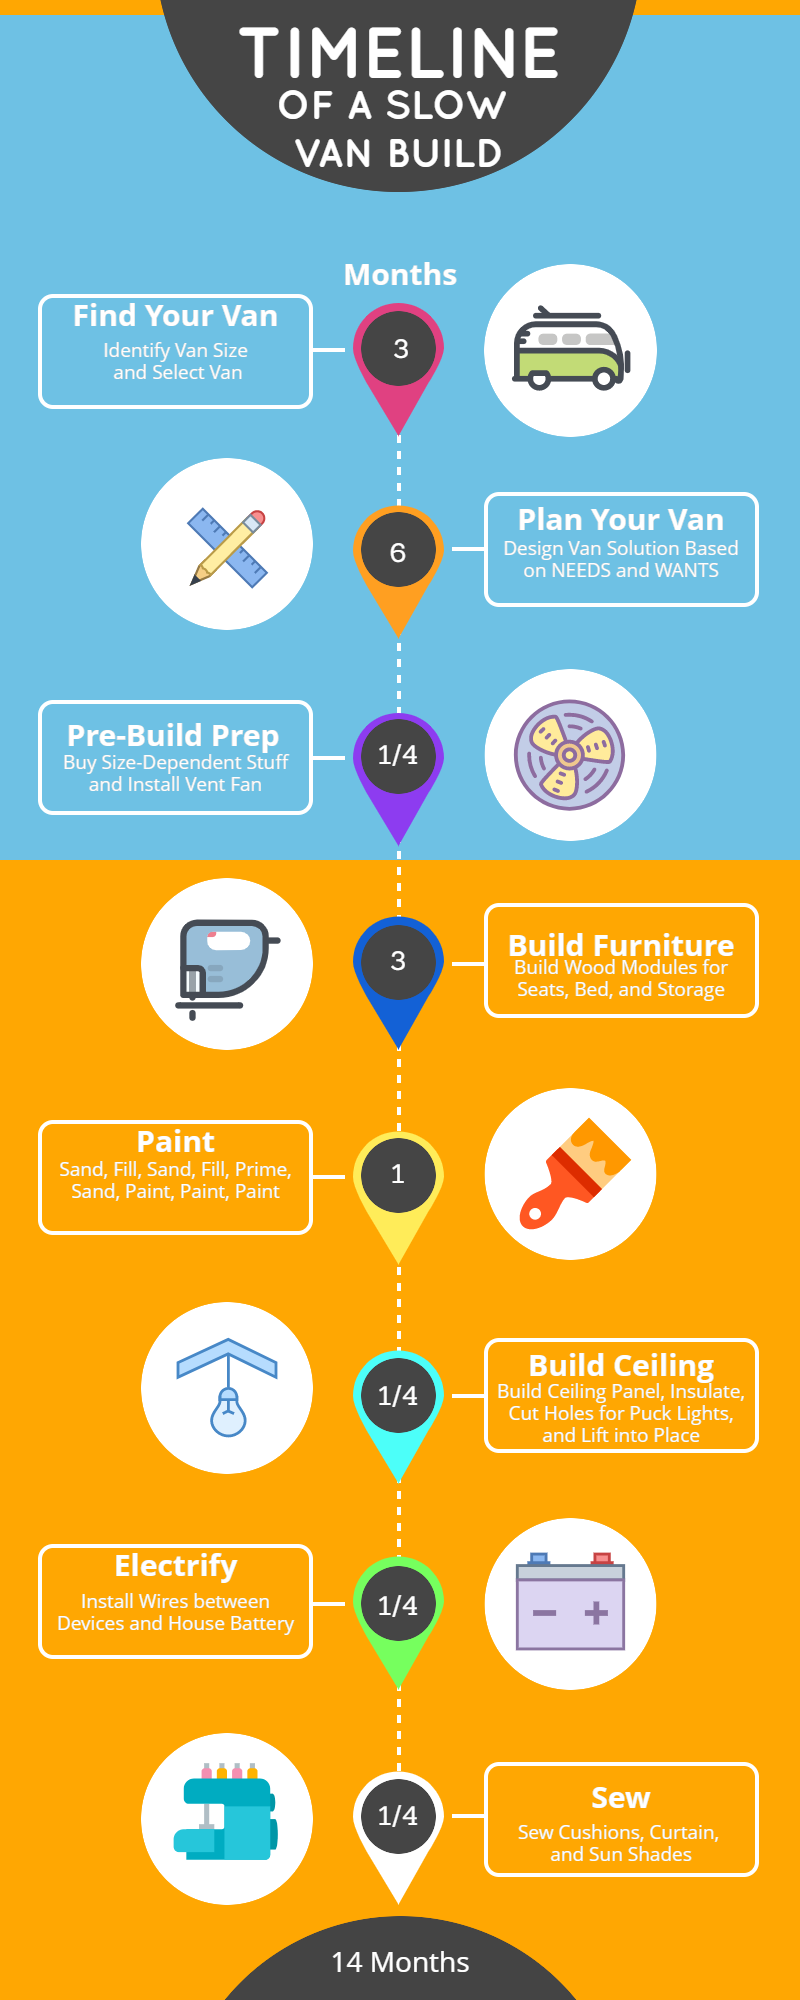
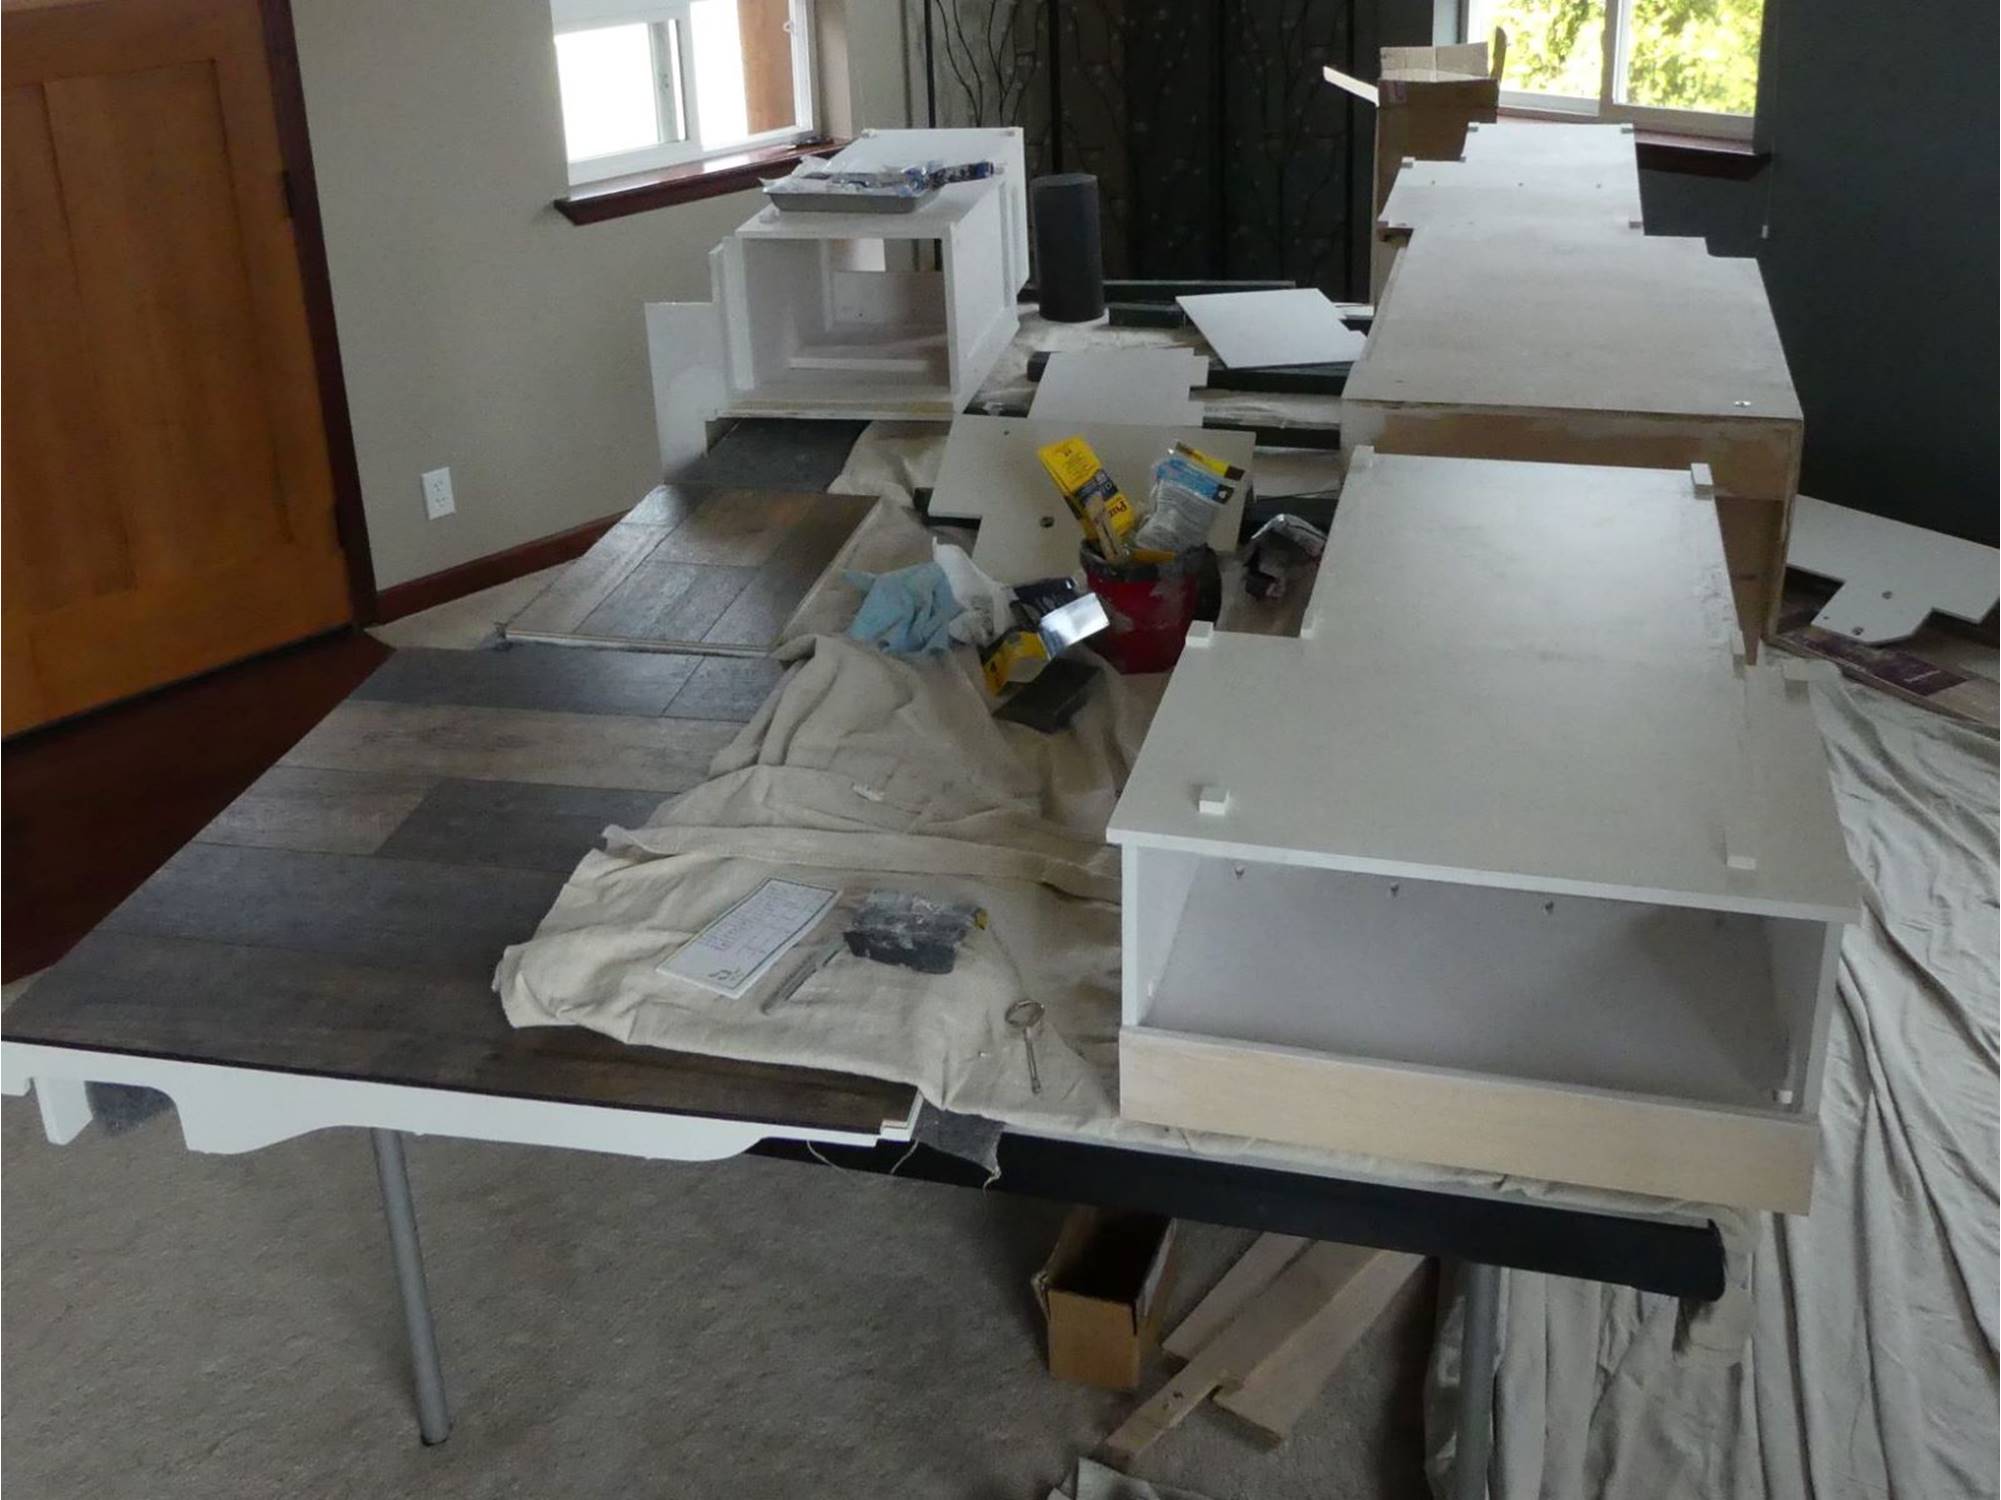
Van Build – A Step-by-Step Answer Guide
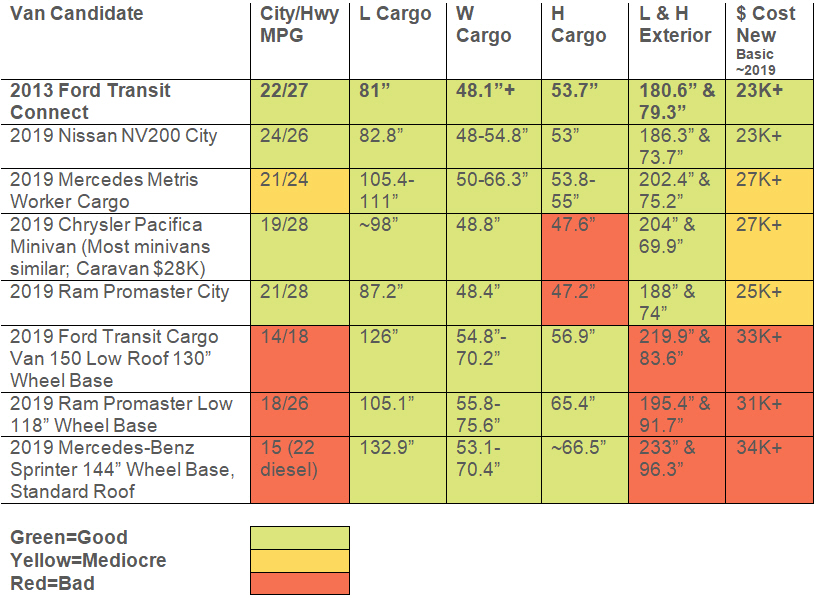
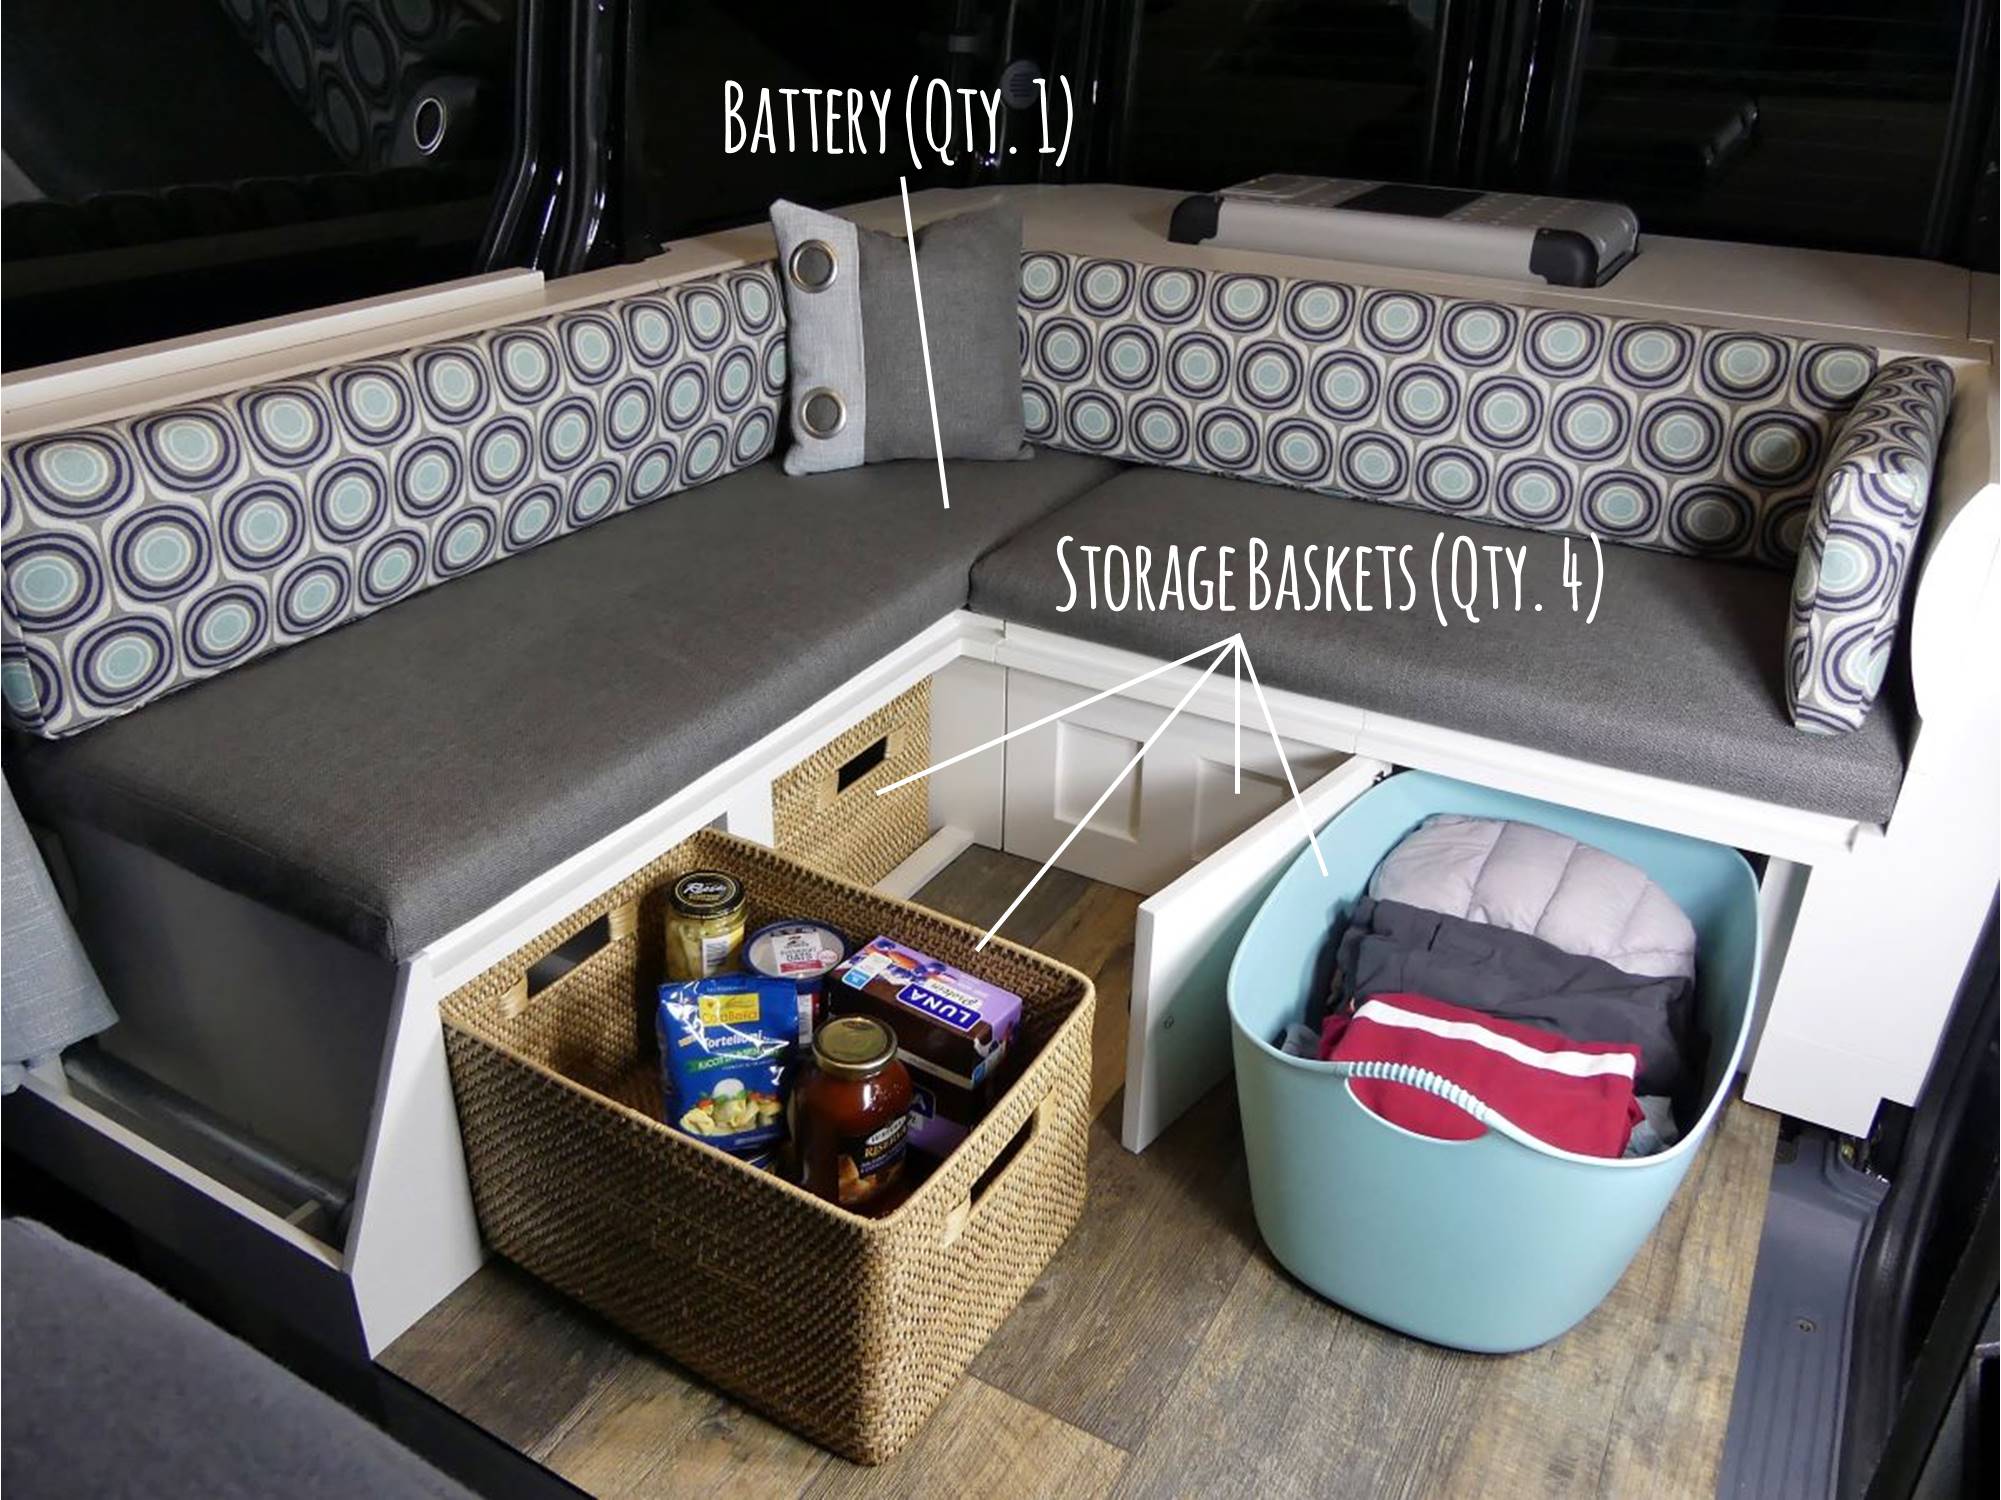
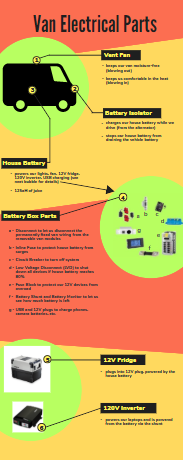
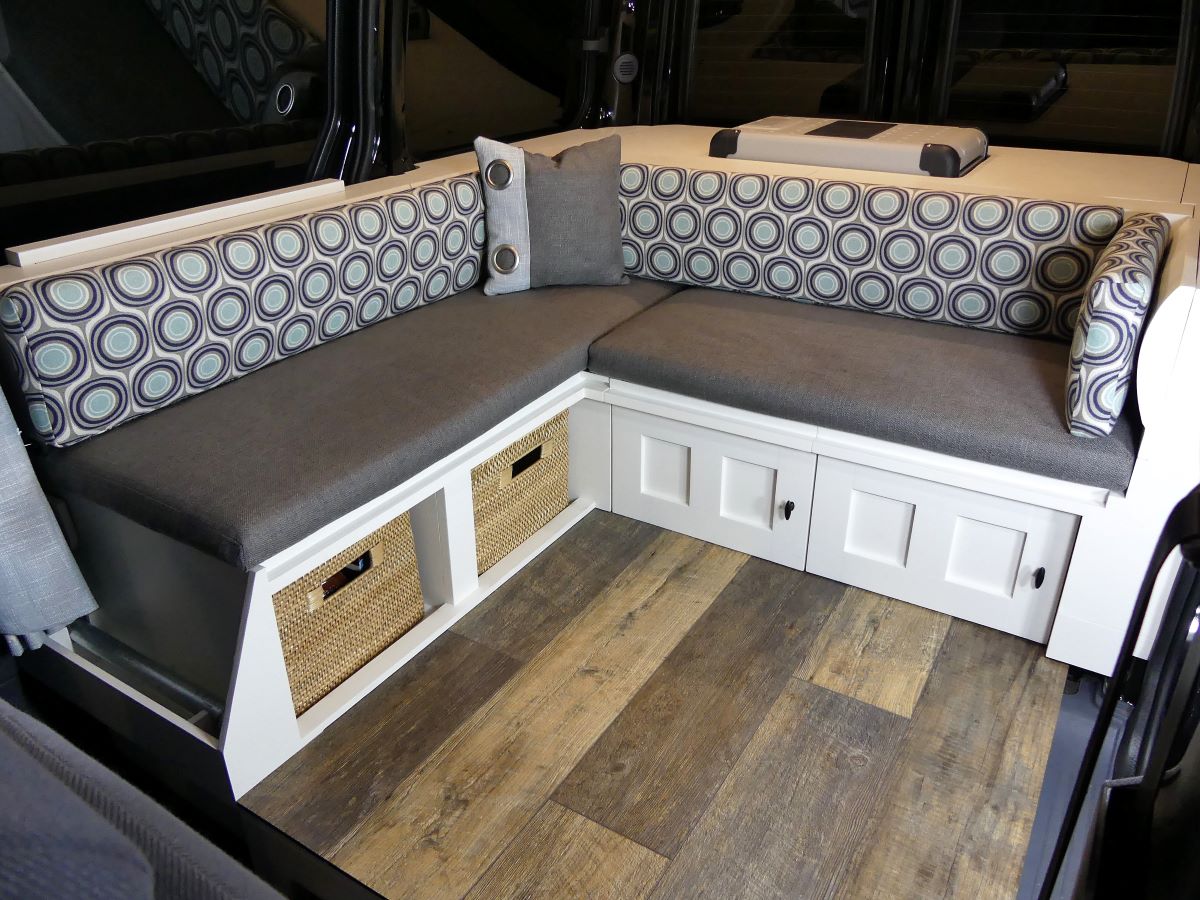
If you’re new here, start at the beginning. If you’re returning, jump ahead to the section you need:

    1. Find Your Van
    2. Plan Your Van
    3. Pre-Build Prep
    4. Build the Furniture
    5. Painting and More Painting
    6. Ceiling
    7. Electrical
    8. Sewing in the Sweatshop

AnswerVanswer is reader-supported. When you buy using Amazon links on our site, we earn a small commission. But don’t worry, the price you see does not increase at all and our reviews will always remain 100% honest. Learn more.

The Big Picture Answers

How Much?

The Van Itself: Used 2013 Fort Transit Connect XLT passenger van with 16,000 miles (out the door) $16,600 

The Minivan RV Conversion: $2,828

Total: $19,428

How Long?

Just so you don’t get down on yourself about how long it takes you to do your own van build, here’s a brutally honest timeline for how long it took us: 14 months of a few nights a week and many weekends.

Yes, we’re slow. We’ve always been slow project doers. Take 1 detail-oriented engineer + 1 detail-oriented technical writer documenting the process = 1 slow van build. But life’s about the journey, not just the destination, right? The bulk of the time (over 9 months) was spent sitting . . . thinking at our computers or working on the CAD model. Another 1 month was spent purely on sanding, filling, priming, and painting coat after coat. The rest was for the actual hands-on van build.

How Hard?

It’s going to take some effort, but just take it one step at a time. You can make your project as easy or as hard as your skills allow and it’s always good to learn something new. Here’s the breakdown of the basic skills and major tools you’ll need for this project:

  • Basic Math
  • Basic Carpentry Skills and YouTube
  • Basic Sewing Skills and/or YouTube
  • Jigsaw
  • Chop saw
  • Circular saw
  • Sander
  • Drill
  • Kreg Jig (for pocket hole joints) 
  • Compressor and nail gun (optional)
  • Standard toolkit (tape measure, box wrenches, Allen wrenches, screwdrivers, square, file, sanding block, pliers, clamps-lots of clamps, etc.)
  • Wire Crimper
  • Wire Stripper
  • Multimeter
  • Sewing Machine

1 Find Your Van

As a former automotive interior design engineer and practical, green-minded couple, we despised the look and feel of RVs and campers, and hated the paltry low MPGs and the hassle and expense of operating (gas), using (campsite fees for electric/water hookups), and storing them. A full size van wouldn’t fit in our garage. But a minivan would.

Our Answer: 2013 Ford Transit Connect XLT Passenger Van​

2013 Ford Transit Connect

    • 26mpg in the real world
    • Nimble
    • Easy to drive
    • It’s tall for great head room

Our Thinking:

Our solution was to buy a small van and customize it ourselves so it could double its usefulness as an everyday vehicle and a mini RV. In 2018 we bought a used 2013 Ford Transit Connect XLT passenger van (with the second row of seats since this is our only vehicle and we occasionally reinstall them when we need to drive other people around).

We chose this model year because

  • This was the last model year Ford made them in the tall 53.7” style (they shrunk 4” to 49.7” in 2014)
  • MPGs were acceptable
  • Our van couldn’t be bigger than 216” (18’) long and 90” (7.5’) tall (allowing for 6” for the roof vent we were going to add) in order to still fit in our garage
Van Build Comparison Table Sizes
Van Candidates

Our Experience:

We love our little van! It gets great gas mileage (26mpg), even in the mountains. It is nimble, even if it isn’t race car fast. That may be an understatement…we can zip in and out of amazing places without worrying about hitting anything, but semis have been known to pass us on the highway from time to time. With good quality all-season tires we can go just about anywhere we want.

2 Plan Your Van

This is the fun part, and the part most of us spend a lot of time daydreaming about. To help focus your Pinterest boards, we’ve come up with a series of questions for every van build aspect.

Kicking It and Sleeping It Off

Hopefully you spend most of your time outside doing cool stuff. But what’s most important to you when you come back to your van home: do you need a full time bed or just a comfy place to sit down, or can you compromise a little on both?

Our Answer: A Most-of-the-Time Booth That Can Transform into a Bed in a Pinch

Our Booth Becomes a Bed in under 5 Minutes

  • The floor raises up to become a bed
  • Good back support and plenty of head room in booth mode
  • 11-inch high seat NOTE: The baskets are a key factor for the seat height

Our Thinking:

We don’t know why, but it sucks to sit out bad weather in the front seats of a vehicle. Maybe because it feels like you should be going somewhere, but you’re at a standstill? We thought it would be great to have a cozy, coffee-shop-type booth that we enjoyed hanging out in. You can picture it: one of those coffee houses that you walk into and want to hang out for hours.

Our Experience:

We love, love, love having our cozy corner booth for chilling during dark evenings and for eating lunch at pullouts along the road with the door wide open to a grand view. Figuring out the seat height was key to moving forward on our design. It had to be comfortable enough for Mr. AnswerVanswer’s long legs, not so high that his head brushed the ceiling, and high enough to fit our storage baskets underneath.

We don’t use the table as much as we thought we would, but when we have more work to do than just answer a few emails, or when we want to watch a movie on the laptop we pull it out and position it wherever we want. We still think it is a must have for us.

We’ve slept in the van in campgrounds after arriving on late, blustery nights and we’ve slept in ski resort parking lots ready to get fresh powder on the first runs. The bed transformation takes one person about 7 minutes to set up and it is so comfortable that we sleep way better than we imagined we would. The bed fits someone up to about 6’2” stretched out.

Questions for You:

  • How high do you need your seat to be?
  • How many people and/or fur babies does the van need to sleep?
  • Do you need a couch or bed or both? Is one more important than the other to you?
  • Must the bed be permanent or are you willing to do some setup?
Attractive Van Build Interior Sleep Bed
Step 5: Arrange cushions into a square and voila, a comfortable bed for two!

Refrigerator, Cooler, or Nada

We were pretty much used to sticking with dry goods on the road. For the little fresh food we typically brought, we wondered if we really needed an expensive refrigerator in the van, if a cooler would be good enough, or maybe nothing at all.

Our Answer: Refrigerators Are Worth It

Meet the Dometic CFX28 12V Refrigerator

  • Big enough for 4+ days of food for 2
  • Super energy efficient
  • Small footprint
  • Rugged and built for rough roads

Our Thinking:

In all our previous trips, we had only traveled twice with a cooler and ice. After the time we opened the cooler to find veggies floating in bloody meat water, coolers were dead to us. Propane fridges require a more complicated setup (including venting to the outside of the van) and dorm fridges just aren’t rugged enough for the job.

Our Experience:

Having a refrigerator in the van is one of our biggest wins. We thought we might enjoy more fresh food while on the road with a refrigerator and it turns out we actually do eat a lot better and it is a game changer. Our refrigerator was the single most expensive item in our entire van build, but we have no regrets at all. It is big enough to go about 4 days between grocery runs. It is quiet and the electricity use is minimal because top loading refrigerators prevent the cold air from rushing out when you open the door. We can easily leave food in the fridge at a trailhead and come back to cold drinks after several days.

Questions for You:

  • How many days do you want to go between grocery stores?
  • Do you mind buying ice every 3-4 days and dealing with the soggy fallout?
  • Will you have a power source? Will it be 12V, 120V, or propane?
Attractive Van Build Interior Storage
Our fridge holds 4+ days of fresh food

Electrifying and/or Solarizing

This aspect of your van build will have you turning in circles. Like most van builders, you probably know little about how electricity works and nothing about how much you will use; there’s a ton of jargon; and there are a hundred different paths to the same goal: enough electricity to last to your next recharge. For your power source you can go with a simple, but expensive, all-in-one portable power pack (think big rechargeable battery that you can plug in or hook up to solar panels), a built-in house battery with a battery isolater that charges while driving, and/or rooftop solar panels.

Our Answer: One House Battery That Charges Automatically During a Short Drive

Hello 125Ah AGM Battery and Battery Isolator

  • About 45 minutes of driving fully charges the battery from its lowest usable level
  • 4 days without driving, no problem
  • Plenty of power for laptop, 12V refrigerator, phone, LED lights, vent fan, and charging other small devices

Our Thinking:

We know ourselves and we get antsy after more than a few days in one spot (the world is big and beautiful and we always want to see what’s next). Since we move along so frequently, we thought we’d be able to charge our house battery from our vehicle battery pretty often, which would keep the size of our battery bank small (one 125Ah battery would hopefully do it, if our calculations were right). The additional hassle and expense of solar seemed unnecessary, although we were initially lured by how cool it would be to have. Although, given a choice, we always park in the shade, not the sun.

We listed all of the electrical devices we might use during a stay in one locale (laptop, refrigerator, phone, LED lights, vent fan, and charging small devices), estimated how long we might use each device, then did a little googling to find their watts. An online calculator helped us add all that up and convert that to amp hours (80Ah in our case). Then, just to be on the safe side, we added about 50% potential capacity and bought a 125Ah deep cycle AGM battery and left room in the battery compartment for a second battery if needed.

Our Experience:

We are grateful (and a little surprised) that our electrical system has worked flawlessly so far. We have never run out of power; not even close. Even after parking for 3 days with the 12V refrigerator running and using the lights every evening to hang out and watch a movie on the laptop it barely made a dent in the power stored in our house battery. Although we’ve never run low on power, we’re still mindful of our electricity usage since on a rainy day we might be prone to binge watching a whole season of Game of Thrones in the van. So far the 1 battery has been enough and we use the extra battery spot to house our emergency road kit, but it’s nice to be able to be flexible if our electricity usage changes in the future.

Our battery isolator has already proven its worth since it saved our butts on a cold January night stuck in the snow on a mountain road. We got stuck in 18″ of fresh powder and had to stop to put our chains on. The chains were new and we spent too much time fooling around with them with all our lights on. After finally getting the chains on we hopped back in, only to find a dead vehicle battery. Don’t panic, it’s no problem: just pop the hood and push a button on the isolator to jump the vehicle battery from the house battery. Voila! We were back on the road.

Questions for You:

  • Have you been leaning toward a cooler, solar lights, and just have a couple of devices to power for 3-4 days between charge-ups? You could consider a small portable power system and perhaps portable solar panels.
  • Do you need to take a TV, microwave, hair dryer, and Instant Pot with you? Hint: A mini RV might not be for you.
  • Are you constantly on the go, seeking new sights, or do you park in one spot for a week to slow down your life?

To Microwave or Not to Microwave?

Early on we had a dream about a small microwave in the van, but it requires so much energy in the first few seconds that it would have required doubling our battery capacity. Also, we never found one small enough to physically fit.

Our Answer: No Microwave

We rely on our Primus Backpacking Stove

  • At 0.5lbs and the size of an orange it’s a big space-saver
  • We stick mainly to one pot meals because no one likes doing dishes anyway
  • We already take it with us for backpacking
  • Gas canisters are available everywhere

Our Thinking:

We’ve always relied on our simple, and therefore reliable, backpacking propane stove when car camping so we stuck to that plan for the van. We also have a special pot with a nifty heat exchanger that boils water in a fraction of the time it takes a regular pot.

Our Experience:

It works just fine for us. We usually take one large (15.5oz for van cooking) and one small (7.75oz for backpacking cooking) propane/butane fuel can. In anything bur really cold weather that usually lasts us a week or longer for mainly simple one pot dinners and a couple of hot beverages a day. If we had a slightly larger van we might have built a slide-out drawer to hold a classic Coleman 2-Burner Stove.

Questions for You:

  • Will you have a power source that can handle a microwave energy spike?
  • Do you have room for a microwave?
  • Are you a gourmet chef?
  • Do you need multiple burners because you’re feeding a lot of people? 

The Actual Kitchen Sink

There’s nothing like a kitchen sink to make a van feel like a real home. There aren’t a lot of options in this area; you can install a small sink with two containers, one for clean and one for dirty water, or you can forego the sink and just use a clean water container that you spill onto the ground as you use it. The easiest way to get “running” water is by using gravity or a manual pump.

Our Answer: Sinkless

The water flows from a 4 Gallon Reliance Water Jug

  • Lasts 2-3 days (for 2 people using ~1/2-1 gallon per day each, supplemented with our water bottles)
  • Refill at campgrounds/visitor centers or fill using our water filter 
  • Easy installation: Doesn’t require any plumbing, electrical, or van modifications
  • BPA-free

Our Thinking:

We definitely had to end up with a water solution that would never, ever leak. We bought a rigid jug because we knew from experience that the flexible jugs are like wrestling a greased pig. We designed our storage compartments to exactly fit this particular jug with the spigot on top (so gravity is working in our favor to prevent leaks). We didn’t want to deal with (or have the space for) a stinky dirty water container: we barely had room for a clean water container, much less a dirty water container and a faucet and a pump.

Our Experience:

The amount of water this jug holds is just about right for us to last about 3-4 days. If we are worried that we might run short, we also fill up our backpacking Platypus water bags too. We eventually hacked together a decent solution for water dispensing by adding some silicon tubing and a push button valve (a valve we had on hand similar to this) to the spigot. We have to pull the jug out onto the bumper a bit and pull the tubing out to dispense it. It is better than removing the entire jug and taking the top off completely to pour, but if we could change anything on our van build it would be to add a tiny sink and USB-rechargeable manual pump faucet. This would let us wash our hands or vegetables without needing a free hand to pull the jug out onto the bumper first.

Questions for You:

  • How much water will you user per day and how many days do you want to go between fill ups?
  • Where is your kitchen? Inside the van, outside the van, fixed, portable?
  • Do you need a drainable sink or can you dump your greywater as you use it?

The Very Important Vent Fan

If you are going to sleep in your van and want to keep it from rusting from the inside out you need a vent fan. So rather than fan or no fan, I suppose the options here are Fan-Tastic or MaxxAir and vent fan either in the front or the rear of the van.

Our Answer: Everyone Needs a Vent Fan

Airflow in any weather with the MaxxAir Vent Fan

  • Super efficient and easy on your battery
  • Works in the rain
  • Reversible fan direction
  • Really quiet

Our Thinking:

We knew we wanted a vent fan and it made sense to put it toward the front of the van, where our heads would be when we slept (and we can open the rear windows for air flow). We chose a MaxxAir fan over the Fan-Tastic mostly just because of the looks; they both had good reviews.

Our Experience:

It was scary to cut a hole in the ceiling practically as step 1, but it is so worth it to have this fan. We use it a lot more than we thought we would. It’s a no-brainer to run the fan on hot nights, but we even pop the vent open on 15 degree winter nights to reduce condensation. The fan is really quiet; so quiet we sometimes forget we have left it on but it’s so efficient that even accidentally leaving it on overnight doesn’t drain our house battery.

Questions for You:

  • Do you need a vent fan? We can answer this for you: YES. You need a vent fan if you are ever sleeping in your van.
  • Are you brave enough to cut a hole in your ceiling? JUST DO IT.
  • Will you have a power source? If not, you’ll have to wire it to your vehicle battery and add a device to prevent the vent fan from draining your battery.
  • Do you want the fan in the front, the back, or over the kitchen?

Let There be Lights

Whether you need to work in your van or just want to be able to find that dropped peanut under the seat, you’re going to need some lights. The solutions for this vary widely. You can hard wire lights to a battery (it’s not really too hard) or you can get rechargeable lights. You could really simplify your lighting with a solar or rechargeable lantern.

Our Answer: Hard Wired Puck Lights and a Solar/Rechargeable Lantern

Puck Lights, a Chandelier, and a Campfire Lantern do the trick

  • 8 LED puck lights total
  • 4 that are manually operated on a dimmer switch
  • 4 that come on automatically when a door opens
  • 1 “chandelier” created with fairy lights
  • 1 portable lantern for night time forays

Our Thinking:

Mr. AnswerVanswer wanted it really bright, so we couldn’t skimp on the ceiling lights. On the other hand, Mrs. AnswerVanswer didn’t want to feel like she was under interrogation, so we thought a good compromise was to get an on/off switch that was also a dimmer dial for turning the lights up or down.

Our Experience:

We can light it up like crazy with puck lights in our ceiling or make it cozy with our fairy light chandelier (totally optional). As long as you have a dimmer, we don’t think you can have too many lights. 24W total for our van size is the right amount. We also added the chandelier as a fun project to cover up the functional-looking fan screen. And we have a portable LED lantern (solar and USB rechargeable) that has a cheesy crackling fire mode that still delights us .

Questions for You:

  • Will you have a power source? Are you limited in the power you can draw for lights?
  • How many hours of light will you need per day on average?
  • Do you want to wire some lights to your engine battery so they come on automatically when you open the doors?

Showers: The Wet and The Wild

If you’re thinking of an indoor van shower, you’re probably looking at a larger van and we can’t offer you any advice; we never even considered an indoor shower or bathtub. We did consider outdoor shower options like solar-heated pipes on the roof with a shower head or a solar-heated bag shower.

Our Answer: We’ll Shower at Campgrounds

shower

We’ll pay campgrounds en route for our showers every 2-3 days

  • We didn’t end up with a lot of room to store outdoor showering equipment inside the van

Our Thinking:

We knew we didn’t have room inside for a shower, but we thought hard about how to add in outdoor shower. We decided to leave room on the roof for a passive heated shower pipe system down the road if we want to upgrade. Sure, an outdoor shower sounds sexy (because you’re thinking of a secluded tropical cabana outdoor shower). We didn’t really see ourselves standing next to the van making a muddy puddle in our bathing suits, awkwardly rubbing our bodies with soap in front of neighboring campers. 

Our Experience:

Right now we plan our trips in order to hit a campground with a shower every few days. In between, taking a dip in a swimming hole or surreptitiously using a washcloth and bar of soap makes us feel human again.

Questions for You:

  • Is this a need or a want?
  • Could you shower outside (with a privacy curtain or in your swimsuit if you have neighbors)?
  • Do you have room to build a pipe system on top of your van for a passive heated shower?
  • Can you shower quickly from a bag of solar heated water?
  • Will you mostly stay at campgrounds with showers or will you stay pretty close to civilization and have a gym membership?

Toilets-Everybody's Gotta Go...

Everybody’s gotta go sometimes. The options range from no toilet to a fully plumbed toilet and in between are portable bagging toilets, bucket and bag toilets, portable flushing toilets, and composting toilets. Honestly, there was never any chance of fitting a toilet, or even a chamber pot, in our mini RV van.

Our Answer: We’ll Use Whatever Toilets We Come Across

Toilet

See a toilet, use a toilet (other people’s toilets)

  • No expensive dump stations to pay for
  • No smell to drive around with

Our Thinking:

Dump stations were another cost we wanted to avoid and having grown up with a regular RV, we know a lot of folks avoid using their toilets because they get so smelly so fast.  

Our Experience:

This solution has been fine. We prefer to let other people deal with our waste. In a pinch, we can always run into the woods with a backpacking shovel.

Questions for You:

  • How particular are you about bathrooms?
  • How much space can you dedicate to this equipment in your van?
  • Ever pooped in the woods? 

Basket Case

Storage is everything in a mini RV van. The baskets you choose will also be a key factor for the final seat height, so design your van from the bottom up. Choose your baskets and consider the sizes very carefully.

Our Answer: Wicker Basket and Plastic Tub Combo

Two Wicker Baskets and Two Plastic Tubs

  • Two 9 1/4” high wicker baskets
  • Two 11” high plastic tubs from Ikea (these give us an 11 3/4-inch high seat)

Our Thinking:

We knew we would need as much storage as we could get. We really liked the look of baskets with other Craftsman-style furniture and initially planned on 4 identical wicker baskets: 1 for snacks (duh) and pantry; 1 for a “junk drawer” as a catch-all for everything (games, books, lantern, cords, toiletries, sunscreen, bug spray, first aid kit); and 2 for clothes (1 for each of us).

Our Experience:

OMG, we learned a lot about baskets during this process. First, do NOT buy woven grass baskets if you have a grass allergy. Yes, in hindsight this does seem obvious. Second, if you find baskets you love, buy all of the ones you need because otherwise it will probably be out of stock. We bought 2 of 4 to make sure we liked them, then the manufacturer delayed shipping the other 2 for 6 months. We finally gave up on them, decided to build doors on our cabinets, and bought IKEA tubs for baskets 3 and 4, which we ended up loving. Third, hand woven baskets vary A LOT in size. It’s better to measure them in person, but if you order them online you might have some trial and error returns. The 2 wicker baskets we ended up with are 9 1/4”H x 17 3/4”W x 12 3/4”D and because they have a wire frame, they don’t vary too much in size (grass-only baskets can vary by more than 1″ in any direction). The 2 plastic tubs we got are 11”H x 22 7/8”W x 15”D. The whole back of the van has more flexible open cubby storage.

Questions for You:

  • What do you need to store? Make a list (then make piles).
  • Can you have a >13” seat height? (If so, you’re in luck because 12” baskets are a lot more plentiful)

Insulation

Common van insulating materials include Reflectix (bubble wrap with foil), Polyiso (rigid white foam boards with foil), extruded polystyrene (blue/pink rigid foam boards), fiberglass insulation (pink fluff), or sheep’s wool insulation.

Our Answer: Sheep’s Wool and Reflectix

Havelock Sheep’s Wool Batts and Reflectix Window Shades

  • Wool is non-toxic
  • Wool has one of the highest R-values for van insulating materials
  • Wool will not mold if it gets wet
  • Both wool and Reflectix were easy to work with

Our Thinking:

We chose sheep’s wool since we needed so little insulation the cost wasn’t prohibitive. It is really easy to work with (no tools, no protective gear) and we’ll sleep better with it right next to our faces (knowing it’s non-toxic). Heat rises, so putting insulation in our ceiling was the most important location.

Reflectix has a pretty low R-value, but it helps a lot to reflect the sun back out of the van and we needed privacy shades anyway so these do double duty. A heavy blackout curtain keeps the temperature fluctuations from the cab out of the back.

Our Experience:

The wool was really easy to install and doesn’t smell. We bought batts, which we could unroll (in the ceiling) or tear and fill (in wall cavities). It has helped a bit with road noise, although good tires made a bigger difference. It’s hard to tell if it slows the heating up or cooling down of the van since our van has so many windows, but we think the wool must help. Larger van builds would likely see more benefits in both areas.

We do know that by putting up the Reflectix window shades and closing the curtain to the cab, we can sleep very comfortably in the van when it gets down to 15 degrees outside (in our 15-20 degree sleeping bags; when we do this in the tent it’s an uncomfortably cold night).

Questions for You:

  • How much space can you afford to give up in your ceiling or floor to insulation?
  • Do you need privacy curtains?

Gear Garage/Toy Box

When van shopping we thought long and hard about how to accommodate our mountain bikes, skis, and camping gear. Options include keeping the gear inside (in our case, some furniture modules would need to be removed), outside the van at ground level, or on top of the van.

Our Answer: Swingaway Hitch and Custom Toy Box

Swingaway Hitch and Custom Toy Box

  • Hitch-mounted toy box swings away so we can still access our rear doors
  • Modular toy box for various configurations
  • Small box for backpacks, etc.
  • Add-on rack for ski gear
  • Add-on middle section to create a tall box for bikes

Our Thinking:

Putting bikes on top of the van might have worked (although it would require 2 people to lift/lower bikes), if Mr. AnswerVanswer could have stomached the idea of his bike constantly getting exposed to road grime and the weather. Keeping the bikes inside would have been the biggest positive in favor of getting a full size van: they would be well protected from theft and the elements. But then again, who really wants muddy, wet bikes in their van bedroom taking up a ton of valuable space? So an external enclosure behind the bumper seemed like the best option. Finding a swingaway hitch rack that rotates completely out of the way to allow rear door access is what really freed us up to get a small van. We built a custom toy box that bolts onto the swingaway frame which houses our bikes and other outdoor gear.

Our Experience:

We built a lockable modular box that can be small (for backpacks or ski gear) or tall (for bikes). The small box, with or without the external mount for skis, is easy to drive with and has great visibility out the back. Having a place to toss all your wet skiing gear at the end of the day is priceless. Turns out, it takes a giant box to house 2 mountain bikes (i.e. it looks like we have a refrigerator on the back of our van). It’s a little nerve wracking at first to get used to driving with the tall box…gotta take those speed bumps real slow, or the resulting bounce will give you a heart attack. We haven’t ventured very far from home with the tall box, but it gets us to the local trails in style and we plan to take it much farther in the future.

Questions for You:

  • What do you need to haul?
  • Can you give up access to your rear doors?
  • Can you get gear (bikes, skis, etc.) on top of your van? Will it take 1 or 2 people?
  • How secure does your gear need to be?
  • Can your gear be exposed to the weather?

3 Pre-Build Prep

Now that you have your design hashed out on paper, it’s time to tackle a few projects.

Buy Size-Dependent Stuff

We designed our van interior to maximize storage and minimize wasted space. That meant we selected our storage basketsrefrigeratorbattery, and water container then designed the modules to those dimensions (well, roughly 1/4” larger on all sides).

Van Front Storage and Battery Locations
Size-dependent purchases that affected our van's front living area
Van Rear Storage, Refrigerator, Water Container Locations
Size-dependent purchases that affected our van's rear storage area

Install Vent Fan

We know this seems like a scary step, but just set a weekend aside, take a deep breath, and dive in (it also helps to do this project in a covered area in case it rains over the next few days since you’ll have a hole in your van roof).

Go to How to Install a Van Vent Fan for all the answers.

Insulate

This was a surprisingly fun part of the van build. Pulling and stuffing wool was really meditative.

Stay tuned for all the answers.

4 Build the Furniture

If you don’t know some basic woodworking skills, you’ll need to learn them. Teaching them to you is beyond the scope of our blog, but YouTube is amazing. We have taught ourselves over the years and usually succeed as long as we think things through and follow the adage measure twice/cut once. You just need a can-do attitude and you really can do it!

We built 3 individual furniture modules (so they are easy to remove and install) mostly out of 1/2″ birch plywood with a few poplar and pine structural members using a new type of hardware (for us): Kregjig screws that allow you to attach panels at 90 degree angles with a nifty drill jig.

Stay tuned for all the answers.

5 Painting and More Painting

We filled, sanded, primed, and painted our little hearts out to make the modules able to withstand life on the road. Maybe we painted too much because when we reinstalled everything we had a lot of tight fits and squeaks (buzz, squeak, and rattle, i.e. BSR, as Mr. AnswerVanswer tells me) that we had to sand or fix with mole skin. Here is our basic order of operations:

  1. Spackle, sand, repeat all surfaces until smooth. We used drywall spackle and a hand held sander with 60 and then 180 grit sandpaper.
  2. Wipe everything down with a rag and then a tack cloth.
  3. Prime with an oil-based primer and let dry completely. We rushed this step and really regretted it.
    TIP: We moved this operation into the house onto the ping pong table so the paint could dry faster in the warmth.
  4. Lightly sand and tack cloth again.
  5. Paint 2-3 coats with exterior paint (we had Sherwin Williams Alabaster white exterior paint from our house trim so that’s what we used), letting dry 1 week between coats and lightly sanding and tack clothing between coats.
Van Module Painting
Here's the paint shop with the furniture modules in progress

6 Ceiling

Our van had a fabric-covered headliner on the ceiling, but that’s pretty boring, so we added a tongue-and-groove “beachy” wood ceiling to hold all of our puck lights. And, by cutting out the existing headliner bump for the existing mid van light we gained a little headroom for our new ceiling.

Stay tuned for all the answers.

VAN BUILD CEILING
The finished ceiling lit up and ready for a night out

7 Electrical

Just keep telling yourself: “I am smart enough to figure this out.” Eventually you will be.

Go to How to Install Electrical for all the answers.

Van Build Electrical Components
The basic electrical components in your system

8 Sewing in the Sweatshop

Just like learning carpentry, you can learn to sew from YouTube. One really good video goes a long way. The two main sewing projects were the cushions and the curtain.

Stay tuned for all the answers.

Van Cushions
Finished van cushions after all the sewing is done